Host and Operating System
The basis for any OpenCanary installation is the operating system. Linux is preferred, it will also work on MacOS and Docker. The OpenCanary Experience (TOCE) runs on Linux because it’s widely available, open source and runs on many devices.
This drives the host; the Raspberry Pi is a more-than-capable host for an OpenCanary instance. In the case of TOCE, the hosts are virtualised in various locations because that gives a geographical spread of instances.
The main TOCE hosts are in Oracle Cloud. Oracle offers a very generous free tier in which an OpenCanary instance can be installed, configured and run – for free. TOCE runs on Ubuntu Service “images” with the “compute shape” offering some basic RAM, storage and an adequate network interface.
Oracle Cloud notes: the Ubuntu image installs with default user as “ubuntu”; since SSH is passwordless, copy the private key when you create your host….this step is important! Knowledge of how VCNs function, how ingress is managed and how you might get traffic to your host – is up to you to discover, learn or know!
Dependencies and OC install
A base Ubuntu Server installation as a self-install or as an image applied to your shape will get you started. The assumption is that the host is running no other services, especially where they may clash with the OpenCanary services. If you are running on a shared machine, it is assumed that you will know how to work around certain challenges.
First things first, refresh and update the operating system:
sudo apt update && sudo apt upgrade
sudo apt install unattended-upgrades
The unattended upgrades option will set your host to automatically apply security updates.
You may also want the latest kernel (optional) which can be installed on Ubuntu with this command:
sudo apt install linux-image-generic-hwe-22.04At this point, you may also want to add and configure the following important and useful components (and you may have more tools you like):
- Tailscale (private network layer)
- NewRelic (send logging data to your free 100Gb/month dashboard)
- ddclient (because a hostname is always nicer than an IP address)
OpenCanary has dependencies that need to be installed. Samba is added because Samba makes for some interesting discoveries…
sudo apt-get install python3-dev python3-pip python3-virtualenv python3-venv python3-scapy libssl-dev libpcap-dev samba
The Python steps are relatively simple; create a virtual Python environment, activate it and fill it with your OpenCanary code:
virtualenv env/
. env/bin/activate
pip install opencanary
Finally, create some folders for content:
mkdir logs samba scripts malware
(from ~, your home folder – I like to put these folders and contents into user space)
At this point, the host has most of what it needs. Now it’s time to get your fingers dirty!
Configuration
OpenCanary
Trigger the creation of a default configuration file which will likely be saved in /etc/opencanary/
env/bin/opencanaryd --copyconfig
At this point, I rename my /etc/opencanaryd/opencanary.conf file to something else and use my preferred editor to start editing a clean file.
Below is a sample file with a log file (into my logs folder) and a webhook to send the JSON to something that reads it easily. It shouts OpenCanary on most interfaces which is helpful when correlating with tooling like Censys (link).
{
    "device.node_id": "YOUR_OC_NAME",
    "ip.ignorelist": [""],
    "git.enabled": true,
    "git.port" : 9418,
    "ftp.enabled": true,
    "ftp.port": 21,
    "ftp.banner": "FTP OpenCanary server ready",
    "http.banner": "Apache/2.2.22 (OpenCanary)",
    "http.enabled": true,
    "http.port": 80,
    "http.skin": "basicLogin",
    "httpproxy.enabled" : true,
    "httpproxy.port": 8080,
    "httpproxy.skin": "squid OpenCanary",
    "logger": {
        "class": "PyLogger",
        "kwargs": {
            "formatters": {
                "plain": {
                    "format": "%(message)s"
                },
                "syslog_rfc": {
                    "format": "opencanaryd[%(process)-5s:%(thread)d]: %(name)s %(levelname)-5s %(message)s"
                }
            },
            "handlers": {
                "console": {
                    "class": "logging.StreamHandler",
                    "stream": "ext://sys.stdout"
                },
                "file": {
                    "class": "logging.FileHandler",
                    "filename": "/home/ubuntu/logs/opencanary.log"
                 },
                "WebHook": {
                    "class": "opencanary.logger.WebhookHandler",
                    "url":"http://IP_ADDRESS/hook",
                    "method": "POST",
                    "data": {"message": "%(message)s"},
                    "status_code": 200
                }

            }
        }
    },
    "portscan.enabled": false,
    "portscan.ignore_localhost": false,
    "portscan.logfile":"/var/log/kern.log",
    "portscan.synrate": 5,
    "portscan.nmaposrate": 5,
    "portscan.lorate": 3,
    "smb.auditfile": "/var/log/samba-audit.log",
    "smb.enabled": true,
    "mysql.enabled": true,
    "mysql.port": 3306,
    "mysql.banner": "5.5.43-0ubuntu0.14.04.1_opencanary",
    "ssh.enabled": true,
    "ssh.port": 22,
    "ssh.version": "SSH-2.0-OpenSSH_5.1p1 OpenCanary",
    "redis.enabled": true,
    "redis.port": 6379,
    "rdp.enabled": true,
    "rdp.port": 3389,
    "sip.enabled": true,
    "sip.port": 5060,
    "snmp.enabled": false,
    "snmp.port": 161,
    "ntp.enabled": true,
    "ntp.port": 123,
    "tftp.enabled": true,
    "tftp.port": 69,
    "tcpbanner.maxnum":10,
    "tcpbanner.enabled": false,
    "tcpbanner_1.enabled": false,
    "tcpbanner_1.port": 8001,
    "tcpbanner_1.datareceivedbanner": "",
    "tcpbanner_1.initbanner": "",
    "tcpbanner_1.alertstring.enabled": false,
    "tcpbanner_1.alertstring": "",
    "tcpbanner_1.keep_alive.enabled": false,
    "tcpbanner_1.keep_alive_secret": "",
    "tcpbanner_1.keep_alive_probes": 11,
    "tcpbanner_1.keep_alive_interval":300,
    "tcpbanner_1.keep_alive_idle": 300,
    "telnet.enabled": true,
    "telnet.port": 23,
    "telnet.banner": "Welcome to OpenCanary",
    "mssql.enabled": true,
    "mssql.version": "2012",
    "mssql.port":1433,
    "vnc.enabled": true,
    "vnc.port":5901
}
OpenCanary HTTP Skins
The skins for the basic web login interface are in this folder under your virtual environment:
env/lib/python3.10/site-packages/opencanary/modules/data/http/skin/basicLogin
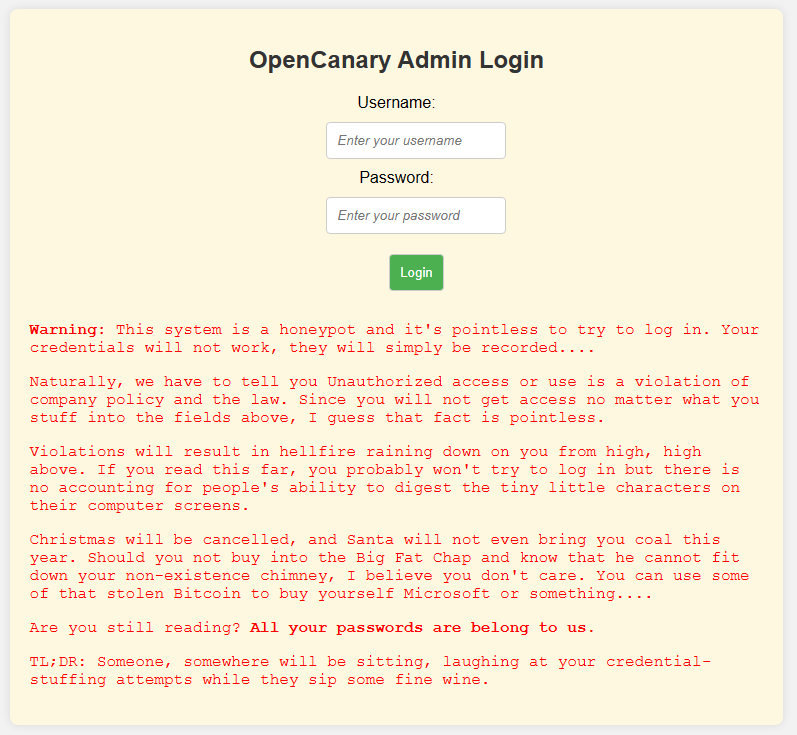
This is a relatively nice example of a better login interface – login banner included!
<!DOCTYPE html>
<html lang="en">
<head>
    <meta charset="UTF-8">
    <meta name="viewport" content="width=device-width, initial-scale=1.0">
    <title>Login</title>
    <style>
        body {
            font-family: 'Arial', sans-serif;
            background-color: #f2f2f2; /* Faint grey background */
            margin: 0;
            display: flex;
            align-items: center;
            justify-content: center;
            height: 100vh;
        }

        .outer {
            background-color: #fff8e1; /* Light yellow background */
            border-radius: 8px;
            box-shadow: 0 0 10px rgba(0, 0, 0, 0.1);
            width: 60%; /* Adjusted width to 60% */
            padding: 20px;
            text-align: center;
        }

        h1 {
            color: #333;
            font-size: 1.5em;
            margin-bottom: 20px;
        }

        h2 {
            color: #ff4444;
            font-size: 1.2em;
            margin-top: 0;
            display: none; /* Initially hide the error message */
        }

        form {
            margin-top: 20px;
        }

        dl {
            display: flex;
            flex-direction: column;
            align-items: center; /* Center align text */
        }

        dt, dd {
            margin-bottom: 10px;
        }

        input {
            padding: 10px;
            border: 1px solid #ccc;
            border-radius: 4px;
            width: 100%; /* Make input boxes take the full width */
            box-sizing: border-box;
            text-align: left; /* Left-align input text */
        }

        input[type="text"], input[type="password"] {
            /* Set placeholder text style */
            color: #aaa;
            font-style: italic;
        }

        input[type="submit"] {
            background-color: #4caf50;
            color: #fff;
            cursor: pointer;
            width: auto; /* Set width to auto to adjust dynamically */
            box-sizing: border-box;
        }

        input[type="submit"]:hover {
            background-color: #45a049;
        }

        .warning {
            font-family: 'Courier New', Courier, monospace;
            margin-top: 20px;
            text-align: left;
            color: #ff0000;
        }
    </style>
</head>
<body>
    <div class='outer'>
        <h1>OpenCanary Admin Login</h1>
        <h2 id="error-message">Login failed</h2>
        <form method="POST" onsubmit="return validateForm()">
            <dl>
                <dt>Username:</dt>
                <dd><input type="text" name="username" placeholder="Username for Honeypot" required /></dd>
                <dt>Password:</dt>
                <dd><input type="password" name="password" placeholder="Password for Honeypot" required /></dd>
                <dt></dt>
                <dd><input type="submit" value="Login" name="btnLogin" /></dd>
            </dl>
        </form>
        <div class="warning">
            <p><b>Warning:</b> This system is a honeypot and it's pointless to try to log in.  Your credentials will not work, they will simply be recorded....</p>
            <p>Naturally, we have to tell you Unauthorized access or use is a violation of company policy and the law.  Since you will not get access no matter what you stuff into the fields above, I guess that fact is pointless.</p>
            <p>Violations will result in hellfire raining down on you from high, high above.  If you read this far, you probably won't try to log in but there is no accounting for people's ability to digest the tiny little characters on their computer screens.</p>
            <p>Christmas will be cancelled, and Santa will not even bring you coal this year.  Should you not buy into the Big Fat Chap and know that he cannot fit down your non-existence chimney, I believe you don't care.  You can use some of that stolen Bitcoin to buy yourself Microsoft or something....</p>
            <p>Are you still reading?  <b>All your passwords are belong to us.</b></p>
            <p>TL;DR: Someone, somewhere will be sitting, laughing at your credential-stuffing attempts while they sip some fine wine.</p>
        </div>
    </div>

    <script>
        function validateForm() {
            // Add your login validation logic here
            // If login fails, display the error message
            document.getElementById('error-message').style.display = 'block';
            return false; // Prevent form submission
        }
    </script>
</body>
</html>
You can of course adapt the web login screen as you wish or switch to the NAS skin in the configuration file.
OpenCanary Service
The most graceful way to manage the OpenCanary is using a service.
Create a file called /etc/systemd/system/opencanary.service and drop these context into it:
[Unit]
Description=OpenCanary
After=syslog.target
After=network-online.target

[Service]
#User=root
#Type=oneshot
RemainAfterExit=yes
Restart=always
ExecStart=/home/ubuntu/env/bin/opencanaryd --start
ExecStop=/home/ubuntu/env/bin/opencanaryd --stop

[Install]
WantedBy=multi-user.target
The following will enable the service:
sudo systemctl enable opencanary.service
OpenCanary Service Monitor
The OpenCanary can crash after time and if many, many connections to it are made.
In the scripts folder, create a file called oc-monitor.sh and paste the following into it:
#!/bin/bash

# Set the path to the counter file
COUNTER_FILE="/path/to/counter.txt"

# Your service name
SERVICE_NAME="your_service_name"

# Log file path
LOG_FILE="/path/to/watcher.log"

# Slack webhook URL
SLACK_WEBHOOK_URL="your_slack_webhook_url"

# Function to log messages
log() {
    echo "$(date +"%Y-%m-%d %H:%M:%S") $1" >> "$LOG_FILE"
}

# Function to send a message to Slack
send_to_slack() {
    local message="$1"
    curl -X POST -H 'Content-type: application/json' --data "{\\"text\\":\\"$message\\"}" "$SLACK_WEBHOOK_URL"
}

# Function to check if the script has sufficient rights
check_permissions() {
    if [ "$(id -u)" != "0" ]; then
        echo "This script must be run as root (sudo)." >&2
        exit 1
    fi
}

# Function to increment the counter
increment_counter() {
    counter=$(cat "$COUNTER_FILE" 2>/dev/null)
    if [ -z "$counter" ]; then
        counter=0
    fi
    echo $((counter + 1)) > "$COUNTER_FILE"
    log "Counter incremented to $((counter + 1))"
}

# Function to reset the counter
reset_counter() {
    echo 0 > "$COUNTER_FILE"
    log "Counter reset to 0"
}

# Function to check if telnet to localhost is possible
check_telnet() {
    (echo >/dev/tcp/localhost/23) &>/dev/null
    return $?
}

# Function to start the service using systemctl
start_service() {
    if sudo systemctl start "$SERVICE_NAME"; then
        log "Service $SERVICE_NAME started"
    else
        log "Failed to start service $SERVICE_NAME. Check permissions."
        send_to_slack "Failed to start service $SERVICE_NAME. Check permissions."
    fi
}

# Function to check the status of the service using systemctl
check_service_status() {
    if sudo systemctl is-active --quiet "$SERVICE_NAME"; then
        return 0
    else
        log "Service $SERVICE_NAME is not active"
        return 1
    fi
}

# Function to check if the script has necessary rights
check_permissions() {
    if [ "$(id -u)" != "0" ]; then
        echo "This script must be run as root (sudo)." >&2
        exit 1
    fi
}

# Main function
main() {
    log "Running script"

    check_permissions

    if check_telnet; then
        # Telnet is successful, reset the counter
        reset_counter
    else
        # Telnet failed
        increment_counter

        if [ $(cat "$COUNTER_FILE") -ge 3 ]; then
            # Counter is 3 or more, trigger a reboot
            log "Rebooting due to telnet failure"
            send_to_slack "Rebooting due to telnet failure"
            sudo reboot
        else
            # Counter is less than 3, try starting the service
            start_service

            # Check if starting the service resolved the issue
            if check_service_status; then
                reset_counter
                send_to_slack "Service $SERVICE_NAME restarted successfully"
            else
                # Service is not running after starting, increment counter
                increment_counter
            fi
        fi
    fi

    log "Script execution complete"
}

# Run the main function
main
Don’t forget to chmod +x oc-monitor.sh to make it executable.
Add the following to the crontab to check that telnet responds and to take action if it is not responding (beware leaving your host without OpenCanary running, it will reboot hourly!).
NB: You may need to put this into the root crontab depending on whether your user can execute certain commands. It should warn you if this is the case….
0 * * * * /home/ubuntu/scripts/oc-monitor.sh
DO NOT START YOUR OPENCANARY YET!
Samba Configuration
Samba is the next item to configure with some file edits and some commands to boot.
In /etc/samba, there is smb.conf. Rename it and edit a blank file with the same name. Below is a sample file with some comments which will serve out content as an SMB share with read/write rights. Be aware that you have to use the following command to allow the login to work (use a random password generator):
[global]
#With only port 445 open, nobody will really see this
workgroup = TOP_SECRET
#The below value will be what the share is named and will be visible
server string = Accounting
#With only port 445 open, nobody will really see this
netbios name = SV_ACCOUNTING
dns proxy = no
log file = /var/log/samba/log.all
log level = 0
#  log level = 2 auth:5 winbind:1
max log size = 100
panic action = /usr/share/samba/panic-action %d
   #samba 4
server role = standalone server
   #samba 3
   #security = user
passdb backend = tdbsam
obey pam restrictions = yes
unix password sync = no
map to guest = bad user
usershare allow guests = yes
load printers = no
vfs object = full_audit
full_audit:prefix = %U|%I|%i|%m|%S|%L|%R|%a|%T|%D
full_audit:success = connect open create_file
full_audit:failure = none
full_audit:facility = local7
full_audit:priority = notice
[Accounting]
comment = Prize files
path = /home/ubuntu/samba
force user = ubuntu
guest ok = yes
read only = no
browseable = yes
sudo smbpasswd -a ubuntu
sudo smbcontrol all reload-config
sudo systemctl restart smbd
sudo systemctl restart nmbd
The log file name and log level seems to be important in getting alerts into the OpenCanary feeds. Ensure you add the following into /etc/rsyslog.conf and restart the syslog daemon after taking ownership of the log file
$FileCreateMode 0644
local7.*        /var/log/samba-audit.log
sudo touch /var/log/samba-audit.log
sudo chown syslog:adm /var/log/samba-audit.log
sudo systemctl restart rsyslog
sudo systemctl restart syslogIf you’re running OpenCanary in an internal network and want discovery to be easy, you need WSDD.
sudo apt install wsddThe SMB share should now work if you connect directly (accepting any username and password).
Monitoring the Samba Share
The following script forms the basis of the folder monitor. It will watch your Samba share for new files, copy them and submit them to VirusTotal. Additionally, it will count the current number of samples in the folder and provide a variation summary on the SHA256 hashes of the files in the folder.
#!/bin/sh

# Set the directory to be monitored
watch_dir="/home/ubuntu/samba"

# Set the destination directory
dest_dir="/home/ubuntu/malware"

# Set the log file
log_file="/home/ubuntu/logs/folder-watcher.log"

# Set the Slack webhook URL
slack_webhook_url="<https://hooks.slack.com/sxxx>"

# Set the VirusTotal API key
APIKEY="get_your_own"

# Wait for a file or directory to be added/modified to the watched directory
inotifywait -m -r -e close_write --format "%w%f" "$watch_dir" | while read file; do
    echo "File $file has been closed for writing"
    filename=$(basename "$file")  # Extract only the filename
    timestamp=$(date +"%y%m%d%H%M%S")  # Generate a timestamp in the format -yymmddhhmmss
    dest_file="$dest_dir/${filename%.*}-$timestamp.${filename##*.}"  # Set the destination filename with timestamp

    # Check if the file is still open
    while lsof "$file" >/dev/null; do
        sleep 1
    done

    # File is closed, proceed with copying
    cp "$file" "$dest_file"

    # Check if the copy was successful before proceeding
    if [ $? -eq 0 ]; then
        echo "$(date) - Successfully copied $file to $dest_file" >> "$log_file"

        # Use vt-scan.sh to submit the file to VT
        /home/ubuntu/scripts/vt-scan.sh -k "$APIKEY" -f "$dest_file" >> "$log_file"

        # Count the number of files in the malware folder
        file_count=$(find "$dest_dir" -type f | wc -l)

        # Calculate SHA256 hash for each file and count unique hash values
        hash_count=$(find "$dest_dir" -type f -exec sha256sum {} \\; | awk '{print $1}' | sort -u | wc -l)

				# Run clamscan on the copied file
        clamscan --remove=yes "$file" >> "$log_file"

        # Notify Slack with the filename, count, and unique hash count
        curl -H 'Content-Type: application/json' -d '{"text":"'"[CanaryName/Location] $(date): Malware - $filename (Files: $file_count, Unique Hashes: $hash_count)"'"}' "$slack_webhook_url"
    else
        echo "$(date) - Error copying $file to $dest_file" >> "$log_file"
    fi
done
You will need vt-scan.sh in your scripts folder too. This will parse the files into VirusTotal and is called from folder-watcher.sh.
To ensure folder-watcher.sh and vt-scan.sh work, ensure the tooling they use is installed:
apt install inotify-tools jq
ClamAV is also baked into the Samba folder-watcher.sh; install and update it if you want to act like a normal computer on the Internet:
sudo apt install clamav clamav-daemon
sudo systemctl stop clamav-freshclam
sudo freshclam
Log Rotation
Create a file called
/etc/logrotate.d/opencanary
The file should look something like this:
/home/ubuntu/logs/opencanary.log {
su ubuntu ubuntu
daily
rotate 7
compress
delaycompress
copytruncate
}
You’ll need another file to rotate the monitor log.
/etc/logrotate.d/oc-monitor
Add the following to it to rotate those logs:
/home/ubuntu/logs/oc-monitor.log {
su ubuntu ubuntu
daily
rotate 7
compress
delaycompress
copytruncate
}
SSH Port Move
OpenCanary will benefit from running SSH, it’s a popular port…! This means that the default SSH port needs to be moved to a new port either with routing/firewall or configuring a different port. I prefer to move my host to a new port so that the OpenCanary can use port 22 natively.
In the file /etc/ssh/sshd_config, uncomment the following line and change the port number:
#Port 22
You may want to be cautious too – it will accept more than one port number:
Port 22
Port 6622
Restart the SSH service and try connecting on the new port:
sudo systemctl restart sshd
If you left Port 22 functioning as a safety net, you will want to comment this out in the configuration and restart the service again.
Firewall and Ports
It would usually be necessary to open the ports you use so that the firewall does not block them. The iptables commands cover all the ports I configure as default – note also the port 6622 from the moved SSH daemon.
If you are running in a Cloud VM, you may also need to open ports in your VCN to allow the traffic to get to your host.
sudo iptables -I INPUT -m state --state NEW -p tcp --dport 21 -j ACCEPT
sudo iptables -I INPUT -m state --state NEW -p tcp --dport 23 -j ACCEPT
sudo iptables -I INPUT -m state --state NEW -p tcp --dport 69 -j ACCEPT
sudo iptables -I INPUT -m state --state NEW -p tcp --dport 80 -j ACCEPT
sudo iptables -I INPUT -m state --state NEW -p tcp --dport 123 -j ACCEPT
sudo iptables -I INPUT -m state --state NEW -p tcp --dport 445 -j ACCEPT
sudo iptables -I INPUT -m state --state NEW -p tcp --dport 1433 -j ACCEPT
sudo iptables -I INPUT -m state --state NEW -p tcp --dport 3306 -j ACCEPT
sudo iptables -I INPUT -m state --state NEW -p tcp --dport 8080 -j ACCEPT
sudo iptables -I INPUT -m state --state NEW -p tcp --dport 5060 -j ACCEPT
sudo iptables -I INPUT -m state --state NEW -p tcp --dport 5901 -j ACCEPT
sudo iptables -I INPUT -m state --state NEW -p tcp --dport 6379 -j ACCEPT
sudo iptables -I INPUT -m state --state NEW -p tcp --dport 9418 -j ACCEPT
sudo iptables -I INPUT -m state --state NEW -p tcp --dport 6622 -j ACCEPT
sudo netfilter-persistent save
You might also need this:
sudo apt install netfilter-persistentStart your Engines!
You are ready, in theory, to start your OpenCanary:
sudo systemctl start opencanary.service
You can check it all works with a tail on your log file:
tail -f logs/opencanary.log