Putting an OpenCanary into the Cloud is a free and fun way to see what the Internet background radiation looks like. If you do this, you’ll see your host will be popular and find out what ports and protocols the Bad Guys are using to try to get into badly-secured boxes out there.
The Basics
You can do this all for free using the following resources:
- Oracle Cloud Infrastructure (OCI) free tier (Google Cloud, Raspberry Pi, etc)
- OpenCanary
- Loggly free tier or a free Splunk enterprise (limited log volume)
Host Setup
Within OCI, you should implement an Ubuntu VM (on the VM.Standard.E2.1.Micro VM shape) with a public IP address. This free VM has a limited amount of bandwidth but for the OpenCanary, it will be more than enough…! 👍
You need to ensure the following when you set up the VM:
- Copy the private key locally so you can SSH to the VM
- Understand how to convert the private key to a format putty can use
- Be happy with the user provisioned for you (ubuntu)
- The security group for the subnet will need to be updated to allow certain ports and protocols to reach the host – this is all to be done in OCI before the box becomes “hot”
Once you’re SSHed into your VM, you need to do the following:
sudo apt update
sudo apt upgrade
This will update the packages on the VM. Now you’re ready to build out your OpenCanary setup.
sudo apt-get install python3-dev python3-pip python3-virtualenv python3-venv python3-scapy libssl-dev libpcap-dev
sudo apt install samba
This will install all of the packages and dependencies you need to get started. If you want to run Samba on your OpenCanary and have alerts on SMB events, you need that too.
In OCI; you’re logged into the box as the user ubuntu. Since it’s a single-use box, I see no need to add a new user and add that user to the sudoers – but you might want to.
Next, prepare the environment for the OpenCanary
virtualenv env/
. env/bin/activate
pip install opencanary
pip install scapy pcapy #install this if you want to use SNMP
The OpenCanary is then ready for action and configuration……
env/bin/opencanaryd --copyconfig
sudo nano /etc/opencanaryd/opencanary.conf
You can edit your config and enable services as you wish. Some interesting variations are possible, my OpenCanary is mimicking a Synology DSM webserver on port 5000 (HTTP).
If you install and enable Samba (tips later) then it’s important to refer the SMB section to pull the correct Samba log (in the default configuration, it is not set properly).
{
    "device.node_id": "your_canary_name",
    "ip.ignorelist": [  ],
    "git.enabled": false,
    "git.port" : 9418,
    "ftp.enabled": true,
    "ftp.port": 21,
    "ftp.banner": "FTP server ready",
    "http.banner": "Apache/2.2.22 (Ubuntu)",
    "http.enabled": true,
    "http.port": 80,
    "http.skin": "basicLogin",
    "httpproxy.enabled" : false,
    "httpproxy.port": 8080,
    "httpproxy.skin": "squid",
    "logger": {
        "class": "PyLogger",
        "kwargs": {
            "formatters": {
                "plain": {
                    "format": "%(message)s"
                },
                "syslog_rfc": {
                    "format": "opencanaryd[%(process)-5s:%(thread)d]: %(name)s %(levelname)-5s %(message)s"
                }
            },
            "handlers": {
                "console": {
                    "class": "logging.StreamHandler",
                    "stream": "ext://sys.stdout"
                },
                "file": {
                    "class": "logging.FileHandler",
                    "filename": "/home/ubuntu/opencanary.log"
                 },
                "teams": {
                    "class": "opencanary.logger.TeamsHandler",
                    "webhook_url":"https://mal639.webhook.office.com/webhookb2/*xyz*"
                 },
                "WebHook": {
                    "class": "opencanary.logger.WebhookHandler",
                    "url":"http://logs-01.loggly.com/inputs/*xyz*",
                    "method": "POST",
                    "data": {"message": "%(message)s"},
                    "status_code": 200
                }
            }
        }
    },
    "portscan.enabled": false,
    "portscan.ignore_localhost": false,
    "portscan.logfile":"/var/log/kern.log",
    "portscan.synrate": 5,
    "portscan.nmaposrate": 5,
    "portscan.lorate": 3,
    "smb.auditfile": "/var/log/samba-audit.log",
    "smb.enabled": true,
    "mysql.enabled": true,
    "mysql.port": 3306,
    "mysql.banner": "5.5.43-0ubuntu0.14.04.1",
    "ssh.enabled": true,
    "ssh.port": 22,
    "ssh.version": "SSH-2.0-OpenSSH_5.1p1 Debian-4",
    "redis.enabled": false,
    "redis.port": 6379,
    "rdp.enabled": false,
    "rdp.port": 3389,
    "sip.enabled": false,
    "sip.port": 5060,
    "snmp.enabled": false,
    "snmp.port": 161,
    "ntp.enabled": false,
    "ntp.port": 123,
    "tftp.enabled": true,
    "tftp.port": 69,
    "tcpbanner.maxnum":10,
    "tcpbanner.enabled": false,
    "tcpbanner_1.enabled": false,
    "tcpbanner_1.port": 8001,
    "tcpbanner_1.datareceivedbanner": "",
    "tcpbanner_1.initbanner": "",
    "tcpbanner_1.alertstring.enabled": false,
    "tcpbanner_1.alertstring": "",
    "tcpbanner_1.keep_alive.enabled": false,
    "tcpbanner_1.keep_alive_secret": "",
    "tcpbanner_1.keep_alive_probes": 11,
    "tcpbanner_1.keep_alive_interval":300,
    "tcpbanner_1.keep_alive_idle": 300,
    "telnet.enabled": true,
    "telnet.port": 23,
    "telnet.banner": "Please log in to proceed",
    "telnet.honeycreds": [
        {
            "username": "admin",
            "password": "$pbkdf2-sha512$19000$bG1NaY3xvjdGyBlj7N37Xw$dGrmBqqWa1okTCpN3QEmeo9j5DuV2u1EuVFD8Di0GxNiM64To5O/Y66f7UASvnQr8.LCzqTm6awC8Kj/aGKvwA"
        },
        {
            "username": "admin",
            "password": "admin1"
        }
    ],
    "mssql.enabled": false,
    "mssql.version": "2012",
    "mssql.port":1433,
    "vnc.enabled": true,
    "vnc.port":5901
}
For each port you open, you need to enable inbound traffic for each port – then save the ruleset so that it survives reboots (you may need to install iptables-persistent first):
sudo iptables -I INPUT -m state --state NEW -p tcp --dport 80 -j ACCEPT
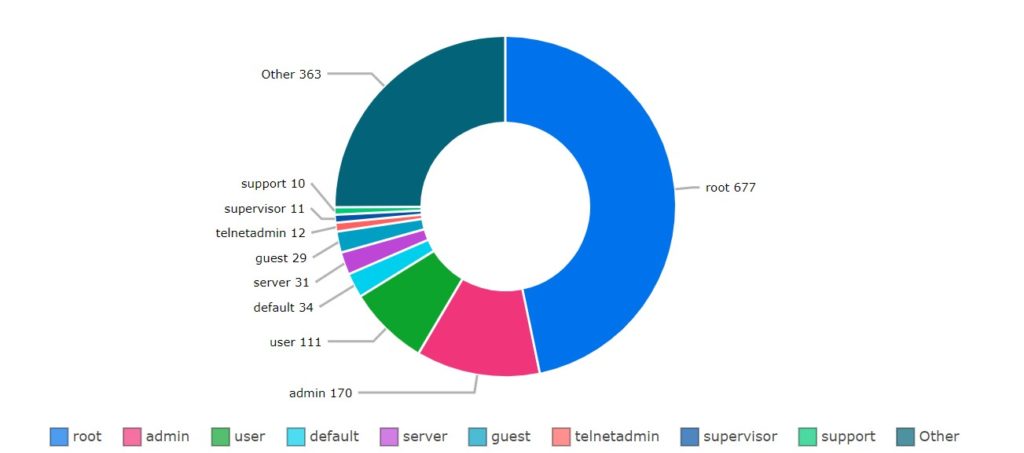
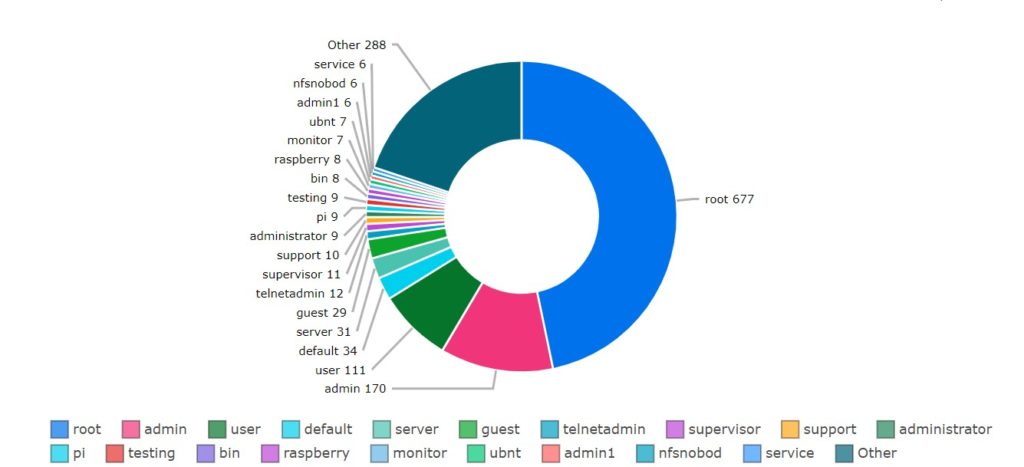
sudo netfilter-persistent saveWebhooks are being used to push events into Teams (noisy! You can also pump events into Slack but you may not like it) and into SolarWinds’ Loggly platform. The free tier has some limitations but produced nice visuals – like this:
For those webhooks, you need to get your own URI to point the alerts into the service you desire.
If you’re enabling SSH on your OpenCanary, you will want to move the SSH port – see the section below on how to do that.
Samba and WSDD
Samba is an interesting but seemingly unattacked protocol on the Internet, at least from the OpenCanary instances I’ve run facing the Internet. The configuration should look like this:
[global]
   workgroup = YOUR_WORKGROUP
   server string = *string*
   netbios name = SOMETHING_TASTY
   dns proxy = no
   log file = /var/log/samba/log.all
#  log level = 0
   log level = 1 auth:5 winbind:5
   max log size = 100
   panic action = /usr/share/samba/panic-action %d
   #samba 4
   server role = standalone server
   #samba 3
   #security = user
   passdb backend = tdbsam
   obey pam restrictions = yes
   unix password sync = no
   map to guest = bad user
   usershare allow guests = yes
   load printers = no
   vfs object = full_audit
   full_audit:prefix = %U|%I|%i|%m|%S|%L|%R|%a|%T|%D
   full_audit:success = pread_recv pread_send
   full_audit:failure = none
   full_audit:facility = local7
   full_audit:priority = notice
[Accounting]
   comment = Prize files
   path = /home/ubuntu/samba
   force user = ubuntu
   guest ok = yes
   read only = no
   browseable = yes
Ensure you have a samba directory in your home directory!
Reload and restart the Samba components.
sudo smbcontrol all reload-config
sudo systemctl restart smbd
sudo systemctl restart nmbd
Force user to ubuntu seems a reasonable step to take; your Windows client might ask for a username/password but any will work. Don’t forget to set a SMB password for your ubuntu user:
sudo smbpasswd -a ubuntuThe log file name and log level seems to be important in getting alerts into the OpenCanary feeds. Ensure you add the following into /etc/rsyslog.conf and restart the syslog daemon after taking ownership of the log file
local7.* /var/log/samba-audit.logsudo touch /var/log/samba-audit.log
sudo chown syslog:adm /var/log/samba-audit.log
sudo systemctl restart rsyslog
sudo systemctl restart syslogIf you’re running OpenCanary in an internal network and want discovery to be easy, you need WSDD.
sudo apt install wsddA side-benefit of running Samba is that you can lift the /var/tmp/opencanary.log from your system using that.
ddclient
The ddclient service is useful to give your OpenCanary a more memorable name, rather than an IP address. Run the following command and plug yourself into a compatible service:
sudo apt install ddclientIt makes sense to have your own DNS name for the OpenCanary; some services rotate public IP and you will not care. Also consider Tailscale because this is will make your life easier – having a Tailscale layer to connect your devices in privacy and without NATting ports into your network.
Moving SSH to a new port
If you’re listening on SSH to the Internet, you will want to move your SSH port to another port. Be careful doing this as, on OCI, if you cannot connect via SSH, it will be problematic for you 😳
The /etc/ssh/sshd_config file starts like this:
#       $OpenBSD: sshd_config,v 1.103 2018/04/09 20:41:22 tj Exp $

# This is the sshd server system-wide configuration file.  See
# sshd_config(5) for more information.

# This sshd was compiled with PATH=/usr/bin:/bin:/usr/sbin:/sbin

# The strategy used for options in the default sshd_config shipped with
# OpenSSH is to specify options with their default value where
# possible, but leave them commented.  Uncommented options override the
# default value.

Include /etc/ssh/sshd_config.d/*.conf

#Port 22
Port 2222
#AddressFamily any
#ListenAddress 0.0.0.0
#ListenAddress ::
You can enable two ports at once, this might be your safety net. Also, with an existing connection to port 22 still open, you can restart the ssh daemon and it should stay connected. Do not forget to enable connections on the new port in the subnet security group.
If you have port 22 active and add 2222, you can restart the ssh daemon as below and test your connection:
sudo systemctl restart sshdFingers crossed!!
Before Firing Her Up
An interesting challenge that you can be saved from is the OCI Ubuntu image not using ufw. When you check the status of ufw (sudo ufw status), it will report inactive. If you started your OpenCanary already and it’s quiet, you will now know why…..!
The services you’ve enabled in the configuration file need to be varied on in IPTables. Change the port in the command below to your desired port and ensure protocol is correct before committing them active.
sudo iptables -I INPUT -m state --state NEW -p tcp --dport *port* -j ACCEPT
sudo netfilter-persistent save
Manual or Auto Start?
If you want to go for it and run now, it’s quite simple. When you’re in your Ubuntu home directory (/user/ubuntu – or your own user home directory), you’ll find the OpenCanary daemon in env/bin and can run it simply with this command:
env/bin/opencanaryd --startIf you did everything right, OpenCanary will run. Try connecting to one of your services to make sure it’s answering the connection requests!
For an automatic startup using a service, you will want to create that service. Create the service file with this command:
sudo nano /etc/systemd/system/opencanary.serviceThe file should look like this (see the discussion here on Github for background):
[Unit]
Description=OpenCanary
After=syslog.target
After=network-online.target

[Service]
RemainAfterExit=yes
Restart=always
ExecStart=/home/ubuntu/env/bin/opencanaryd --start
ExecStop=/home/ubuntu/env/bin/opencanaryd --stop

[Install]
WantedBy=multi-user.target
You will need to force the service refresh and enable the service before starting it.
sudo systemctl enable opencanary.service
sudo systemctl start opencanary.service
Log Rotation
Now for the log rotation because an OpenCanary in the wild gets lots of hits. Create a file to rotate the logs:
sudo nano /etc/logrotate.d/opencanaryThe key point is to rotate the log in /home/ubuntu/logs (see above in the opencanary.conf file) on a daily basis to stop it becoming huge. The 365 means it keeps 365 days of logs, copytruncate will rotate whether the file is open or not and compression is good for filespace.
/home/ubuntu/logs/opencanary.log {
        su ubuntu ubuntu
        daily
        rotate 365
        compress
        delaycompress
        copytruncate
}
Crontab
OpenCanary when being hammered (mine has over 500 connections trying usernames per hour) will bork in terms of the webhook into Loggly and you will get gaps. I know this from experience! Enter the following command in your user context:
crontab -eIf your crontab was a virgin at this point, you’ll be asked for the editor of choice. I like nano.
Add the following line at the bottom of your crontab; it will trigger a restart every 3 days.
30 05 1-31/3 * * /home/ubuntu/env/bin/opencanaryd --restart
Upgrading your OpenCanary
Your OpenCanary will need updates at some point, this process is very simple
pip install --upgrade opencanaryFinally, some juicy images from Loggly